A New Dawn Due This Weekend… For Some

Update: HiveWire3D announces Dawn Release Date 9th August. Store now open.

Dawn to heal the split in the DAZ and Poser community?

A good number of you have likely heard the rumblings about a new female figure that is both Poser and DAZ Studio compatible. If you’re a regular on DAZ and Poser FB pages, or the Renderosity and RuntimeDNA forums, you could well know a good deal about this new figure by now. If you tend to get your news from the DAZ forum, or somewhere way down the deepest darkest reaches of the grapevine, this might all be a new revelation for you.

The new lady’s name is Dawn, and an upstart mob known as HiveWire3D are her creators. With a public announcement made just back on the 20th of June it looks like the release is only around the corner. Dawn will be free for a limited time after release.

There was a moment of excitement when I went to check HiveWire3D’s Facebook page for updates. There was something that looked a lot like a release announcement: “Final version of Dawn to be ready by end of this week! Once she is in hand, we’ll announce her release date and get things moving with all interested content creators.” Of course, without coffee in hand, I took this to mean that she would be released by the end of the week. No dice! Content creators will get their hands on her first, and then we’ll hear about the general release. It makes sense that a new figure should be released with a certain amount of content and vendor interest from day one. Runtimes can be very unkind to a figure without a wardrobe.


 So, who is Hivewire3D

This is a question that troubled me some. The initial announcement indicated that the team contained the talents of the creator responsible for Victoria and Michael line of figures. But, who is this mysterious individual? Google turns up very little when you look for the creator of these figures, but after a couple of hours I finally realised I should be looking for who is behind HiveWire3D, not Victoria (durrr). So, Eric Merritt turns up, and then, following soon after, is Christopher Creek, who IS the man responsible for the figures in question.

Eric and Christopher [edit – also e-commerce and marketing guru Steve Kondris], HiveWire3D’s founders, have a long history in the industry spanning back to the top echelons of DAZ 3D, and Zygote Media Group. Among many other more impressive feats, Zygote is responsible for a number of early Poser figures. If you’re a DAZ/Poser trivia buff you will undoubtedly know a split within Zygote resulted in the birth of DAZ Productions. So it’s clear, these guys are not new kids on the block. They know their stuff inside and out.

But what about Dawn?

Enough history and more about our new lady. She isn’t technically compatible with both programs, well not in a singular package, and that’s due to the different weight mapping solutions employed by DAZ Studio and Poser. So, what we really have is two identical figures except one is weighted for Poser and the other for DS. If I’m not mistaken this means that content creators will have a relatively simple time in ensuring their products work for both versions of the figure, at least as far as fitting goes. When it comes to materials, many a vendor would rather walk through burning buildings than go to the lengths of creating two sets for two very different rendering programs. Still, given the differences between the two programs, this is probably the only real way to have a universal figure with all the flexibility it was intended to include at design.

As good as DSON is, it just can’t beat a Poser native weighted figure for performance and flexibility. For many it is close enough, especially for those that happily use both programs.

Weight maps

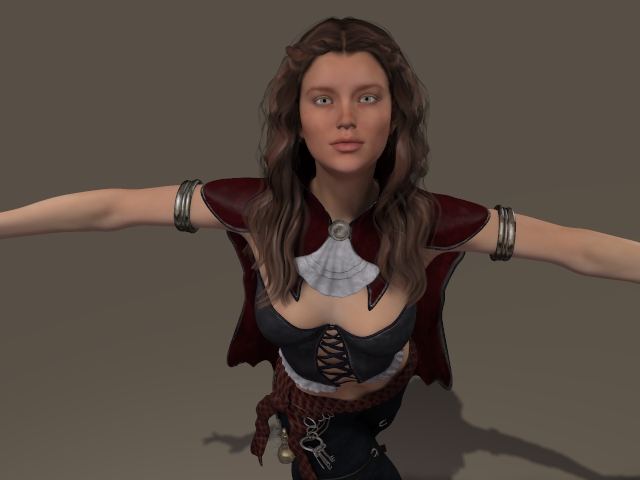
Being a weight mapped figure, Dawn will conform to the new standards Poser and DS users have come to expect. Although with unweighted Victoria and Michael (and the others) still making up a large proportion of figures in use (not to mention selling!), for some, Dawn might be a first when it comes to serious work/play with weighted figures. Oh, what you users will realise you’ve been missing all this time! As you can see from the images she has plenty of well-defined details, and has nice natural bending in the joints.

Posable

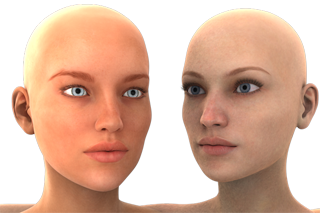
In addition to all the usual movable and posables, Dawn also has a posable jaw (not reliant on morphs), and individually posable toes (Genesis 2/Victoria 6 also has these features). Unlike any figure I have seen, she comes with two sets of eyelashes – one regular and the other “super long” for those fantasy characters. Looking at the image of the ear it seems the figure is designed with subdivision in mind. Dawn seems to be a slightly higher poly figure than the base Genesis 1/2, but a single level of subdivision should be fine on most systems, and then perhaps another at render time for larger images. Over all Dawn appears to have a good level of geometry detail for most uses typical to DS and Poser applications, and looks set to make a valuable addition to runtimes on both sides of the software border.


Reality support

Paolo Ciccone has thrown the support of Reality behind Dawn, and has added her material zones to Reality 3 and is working on ACSEL shaders for Reality 2. These additions will be free. Paolo states the goal is to have “excellent renders of Dawn straight out of the box for all Reality users.” Given the creators humorous comments (intentionally so?), likening Victoria 4’s domination of runtimes everywhere to a looming potato famine, and his mute indifference to Genesis, his enthusiasm for Dawn is no surprise.

Destined to succeed, or another figure to the tomb?

New figures are nothing new to the DAZ/Poser community, but few, especially independent ones, tend to go on to live full healthy and broadly supported lives. Antonia is one of the more recent examples of a great figure fighting a valiant fight, but ultimately failing to take off. The figure came in both weight mapped (Poser 9+) and unweighted (Poser + DAZ) varieties, and was Posers best hope for a current weight mapped figure. Her site and dedicated store is all but abandoned, and the other retailers like Runtime DNA and Renderosity only have a handful of compatible products on their shelves.

What is to say that Dawn won’t go down this street? First and foremost, experience. Between them, Eric Merritt and Christopher Creek have a lot of experience, not just putting quality products together, but in managing and growing businesses and communities. Ensuring Dawn is 100% finished before release seems a priority, as is getting solid content creator support. Both of these factors can only lead to a launch that will be as successful as it can be. Enthusiastic and innovative content creators will turn heads.

A big factor in getting people in right from the start will be the limited time free release. This will undoubtedly have a positive feedback for content creators and the community at large. Finally, given the current state of scene with the generation 4/Genesis/Genesis 2 split, now might just be the perfect time for a new cross compatible figure to emerge. It is unlikely that Dawn will be the extinction event for any of these figures, but she could well become a viable alternative. Who knows what the future will bring.

One anomaly is that HiveWire3D’s figures are and will be without genitals. One of the stated reasons for this decision is that they want to pursue business and educational channels in the future. To me, it seems strange to offer a product that isn’t anatomically correct when educational channels are being perused, but then again I can imagine some problems occurring during high school 3D arts classes. For a large portion of the community this won’t pose a problem, but for instances where full or partial nudity is required it will involve a greater degree of creativity, and perhaps expense, to get the figures ready for these uses. To me this rings puritanical, or pandering to these sensibilities, but then I’m not the one attempting to launch a new figure/content business.

All the best to HiveWire3D and their soon to be released Dawn. May it be the first of many.

At the time of writing HiveWire3D’s website was unavailable, apparently still under construction, but according to a message on their FB group we can expect to see it up very soon.

DAZ3D’s Genesis 2 and Victoria 6 Review

Looking for Victoria 7 review?
Also
Michael 6/Genesis 2 M review

Genesis 2 ProDAZ3D’s regenesis or devolution?

After much speculation since the first hint of Genesis 2 and Victoria 6 on the 13th of June the release has finally happened. Users are just as divided between the excited, neutral and angry camps as it was during the week long silent build up. Well played DAZ3D. They knew the product would be controversial, as just about everything they do seems to be, and the effect was they didn’t have to do a shred of promotion other than dropping a clanger in the store and springing an image rich, detail deficit teaser thread on their PC forum. Word spread fast and speculation ran at fevered pitch.

So, in the light of a new day as the dust begins to settle all those questions have been laid to rest. Genesis 2 comes as two base meshes; Genesis 2 Female (released), and Genesis 2 Male (presumably – yet to be released). While Victoria 6 is a purchase item the base mesh is available for free (Genesis 2 Female Starter Essentials) and can be downloaded via the DAZ 3D Install Manager or via the site from the Product Library.

For many, the move to separate male and female meshes is a backwards step. Genesis was about flexibility and universal morphing. The argument put forward for the split is that this allows for greater levels of gender specific detail that weren’t possible in a unisex mesh. I think this is a reasonable compromise. Future characters such as The Girl 5 and Freak 6 can be made from a mesh specifically designed for their gender, and we won’t have to worry about a hundred thousand fit/morph packs to put that sexy cyber suit for V6 on Aiko 6. Also, this should improve the quality of outfits as vendors will be free to make more gender specific mesh details. For those who see a universal mesh as the absolute end of 3D figure design there is hope.

Victoria 6 for Genesis 2GenX update in the works

Dimension3D intends to update his popular plugin GenX for use with Genesis 2. For those not familiar with the plugin, it allows for the conversion of morphs from previous figures to work with Genesis. Dimension3D had this to say: “I can’t give details or a release date this time, but I’m planning to add morph transfer from Genesis 1 to Genesis 2 and vice versa as well as direct transfer from generation 3 and generation 4 figures to Genesis 2.”

Genesis is going to be able to access morphs for Genesis 2? This will undoubtedly make a lot of G1 diehards very happy, and all at the same time create a work-around for G 2’s inability to mix male and female morphs. Well, undoubtedly a male morph could be created for G2 Female but being able to bring G1’s flexibility to G2 will be very useful and save time and money for those situations where close enough is good enough. Of course I could be reading too much in to this, but it sounds like Dimension3D is gearing up to effectively merge Genesis 1 and Genesis 2 while bridging the gap between G2 Female and male.

Until such a day as we are graced with an updated GenX there are other approaches to consider. Some users have already created male characters by mixing various morphs – see pg. 35 of the Genesis 2 preview thread.

Auto-Fit

Out of the box Genesis 2 has auto-fit capabilities for Genesis content, but a separate product (Victoria 4 for Genesis 2 Female) needs to be purchased to fit V4 clothing and textures. This has been one point in particular that has caused angst among users whether, as of yet, they have bought in or not. Presumably fits for other popular figures will be added as additional purchases, as they were with G1. The up-shot here is that, according to promo material, the V4 to G2 conversion is better than the standard V4 to G1 conversion. One significant leap here is with the fitting of V4 based shoes, particularly those with high heels. The standard G1 conversions absolutely butchered footwear, so this will undoubtedly be an important improvement for those of us who are looking for a quick and easy way fit.

V4 to Genesis 2 Auto-fit workaround

Genesis 2 victoria 4 auto-fit workaround

Genesis 2 victoria 4 auto-fit workaround

If that still isn’t enough to entice everyone then there is a work around. Load Genesis > auto-fit desired apparel > save as support asset > figure/prop asset > clear scene > load G2 > find and load the items just saved > auto-fit as usual

The fit won’t be perfect and will likely require a smoothing modifier to cover good ol’ fashion poke.

Genesis 2 Poser Compatibility

poser dson test

Genesis 2 in Poser via DSON

DSON is still the only easy way to get a poseable Genesis 2 into Poser, which is undoubtedly no surprise to anyone, but still disappointing none the less. This comes with all the boons and dooms of the past Genesis/DSON deal, such as the slowdown experienced while using Genesis/DSON content in Poser Pro 2012/9. Thankfully there is an easy fix for this which a surprising number of users still don’t know about. Simply turn subdivision off in the Scripts > DSON Support menu. In any case working with Genesis in Poser is still a slower process than working with other figures such as the Gen 4 DAZ3D figures. This could be a very different experience for Poser Pro 2014/10 with the advances made since the 2012/9 releases, such as the support for the subdivision methods utilised by Genesis 2. I can’t test the theory, but will update this as soon as I find out.

Compatibility with older DAZ Studio versions

Genesis 2 uses the newer .DUF file format and other new technologies such as weight maps, and as such is not compatible with versions of pre 4.5 versions outside an exported .obj, but this means using current versions of DS anyway.

G2 is compatible to the fullest extent only with DS 4.6x, but will work just fine in 4.5 versions (so I hear) but without the new surface/materials. Luckily it comes with legacy materials, so should be fine but might need a little tweaking.

The experience for most people updating from DS 4.5 to 4.6 has mostly been positive, but there has been some report of issues. OS users seem to have got a better deal with this update than has been the case with previous DS updates. With the new advances in DS since 4.5 it is certainly worth testing out, and since 4 or 3X the progress has been huge – not least of which include significant 3Delight upgrades.

Value for money bundles?

Without a doubt the bundles look pretty good. You get some very nice hair props and texture sets (one comes with the basic V6 product) with the Victoria 6 Starter Bundle, and the outfits, one fantasy and the other, a party dress offer a nice bit of diversity and will likely find use with a lot of users. The Pose sets are always useful when you want to do a quick render or if you want to do something more significant and need some inspiration.

The Victoria 6 Pro Bundle is the same again X2!  The quality of the products is of the same or similar quality and will find use in a wide variety of situations. The included outfits are not my cup-o tea, but there might be some texture magic I can pull for my own tastes – something sci-fi!  The hair props and included textures sets are great with lots of mat varieties. Love the fashion hair – everyone loves a bob! Who’s with me? Oh I forgot to mention, the pro bundle has the genitals (must remember the genitals *note*). The texture sets are by well-known and adored artists such as Silver and Countess (yay for tattoos).

No maps!

no maps

Victoria 6 on left with default textures, and Genesis 2 with Bree textures on right. Maps make a difference!

…but where are the Sub Surface Scattering maps? Unless I’m missing something none of the four included texture sets have SSS maps! There are SSS settings, one of them comes with three… but maps? What is maps? Eh, no one on the forums seems to mind this too much, which has me kind of puzzled. If I could just chuck a V5 map in there with my V6 ones I wouldn’t be so confused or disturbed, but we can’t. Maybe this is just me being some kind of SSS lunatic? People seem to be more concerned with a slight fluctuation in the percentage of the sale price.  Of course a little tweaking can fix up a bright red over powered SSS, but you will only get the fine subtlety and control with proper texture maps (so maybe I should just go make one!).

Genesis is the prize

For me the real value of the package comes in the base Genesis 2 figure, and for those of us who can’t sculpt/morph their way out of a wet paper bag, the Victoria 6 morph. The greater level of detail in the geometry is fantastic. The extra detail in the joints as they bend looks a lot more realistic, and all for the cost of a mere 2000 extra polygons. New weight maps and greater articulation in the jaw, ears, breasts, joints etc gives greater realism when posing.

I think Genesis 2 represents quality over quantity, but with the current discounts on the bundles you certainly get both. DAZ probably could have mitigated a good deal of angst by working out a deal to get the V4 morphs into the starter or pro bundle, especially as many Genesis users take it for granted (and why shouldn’t we?). While we’re talking about morphs again I think adding the morph bundle to the pro product would have been a nice touch, but DAZ have certainly been a shrewd with their content/sales strategy this time around. The lack of morphability at this point in the base G2 product feels very un-Genesisish, but if you’re willing to spend the money you can get a very good product. In any case, I look forward to seeing how the figure develops and what the content creators cook up for us.


Daz Studio Sci-fi Content Feature Pt. 2

A quick note on Poser compatibility: Most if not all content sold at DAZ 3D has very good Poser compatibility, and often comes with Poser specific configurations.

The Artifact by DigiVault - DAZ 3D

DigiVault brings affordable sci-fi content to your DAZ Studio and Poser runtime

With the release of The Artifact by DigiVault it seems like a good time to do the follow up to our Daz Studio Sci-fi Content Feature Pt. 1. “The Artifact is a detailed, large scale set” that comes with the usual texture maps, including specular and bump which denote a product that is a cut or two above cheaper products and offer a greater sense of realism and detail. Anyone who has been rendering for any length of time will know that a good specular map, especially in combination with a bump map, can make all the difference to a still image or animated sequence. It is strange that they are still not stock and standard with every release, at least in ones where they would be useful.

DigiVault is a relatively new vendor to DAZ 3D, but since the release of his first product, The Bunker, back in the second half of 2011. With a number of war torn and sci-fi content releases since then, DigiVault has established a reputation for quality. For the curious in nature the following video will undoubtedly be of interest. It briefly shows how DigiVault’s most recent scene prop evolved from its first beginnings through to completion and final promo render.

In true DAZ style, they have decided to celebrate by throwing a massive sale. Buy any one of the three sci-fi releases and get 40% off Premiere Artist and 50% percent off DAZ Original sci-fi items. Great chance to pick up some of the more expensive items like Stonemason’s Urban Future Bundel, or just about any of the items mentioned in this article. Just remember that you won’t see the discount until you get to the final stage of the checkout process. But more about DigiVault’s releases!

Ruined City - DAZ 3DThe modular Destroyed City and WarZone will be of particular use to anyone looking to quickly make detailed and interesting war torn scenes and post-apocalyptic environments. The sets should work well with any time period from the past to the distant future. Being modular in nature users will be able to quickly arrange and instance partial/destroyed buildings, and rubble to build up believable environments with potential to mix and match with other sets, such as Stonemason’s highly detailed City Ruins sets to add a splash of variety or a focal point.

Team Dystopia

Team Dystopia are a well-recognised coalition of modellers and texture artist’s that have been hanging around DAZ 3D, and putting out a variety of props and Dystopia Drone Trooperfigures for quite a number of years. Their towering, monolithic Dystopia City Blocks, both the freebies and the full priced products have graced thousands of sci-fi renders since their release, as have other iconic models such as the Drone Trooper Another TD freebie you will see regularly gracing DAZ Studio and Poser renders is their Console Station.

Those looking for yet more dystopian flavoured free items should head over to the group’s website and join in on the forums. This was one of the first places I signed up to on my voyage to the 3D worlds. The forum was described to me, by one of the site owners, as being in a state of “slow burn”, which is of course to say, quite. So, it may not be the most happening place in CG land, but it is a friendly place and host to a wealth of information on everything from sci-fi tropes to advice on writing, modelling and much more.

There have been a number of recent releases to carry the Team Dystopia branding, my personal favourite of which is the Dystopia Worker Drone You can find more of the recent releases on Mobius87’s DAZ 3D store page, but do be sure to check out the other related members to find the rest of the booty.

Cyberpunk


Rogue for V4 - ElorOnceDark
As someone who loves a good dose of Cyberpunk it is a little disappointing that there is so little overtly cyberpunk inspired stuff getting released these days. It is there, but it is few and far between. So us cyberpunks make do with what we have, but in the true sense of cp we also “hack” and bend all the lovely sci-fi content to our needs.

So, what are some of the best examples of cyberpunk on the DAZ Store? Stonemason’s Urban Future series is one that jumps to mind, but we’ve already covered this in the previous sci-fi feature content. ElorOnceDark is another name that invariably pops up. His designs are innovative, unique and of the highest quality. It is just a shame that there have not been more recent Genesis releases, but with the release of a refitted version of ArtemisX for Genesis maybe we can hope to see the other classics follow. Of course, there are always the auto-fi tools, which will give a basic and usable Genesis fit. There is also the Sickle Rigging and Morphing System which will undoubtedly return an even better fit. Then, if you are a modeller you can always attempt a Genesis morph or full refit, something I have been meaning to try myself. Anyway, back to the punk. To the top and left is Rogue for V4, undoubtedly there are a hundred and one cyberpunk Cyberpunk for M4 - ElorOnceDarkapplications for this sexy outfit.

Perhaps my favourite of Elor’s releases is Cyberpunk for M4. It is a versatile set that comes with many props including retro analogue data ports, body armour, swords, firearms, cyborg arm implants (which fit to Genesis wonderfully if you hide the arms), and multiple texture sets. All this makes it easily one of the best value for money products available in the entire store. And if you want even more options there is Elor’s expansion as well as several third party expansions such as 26FAHRENHEIT’s PUNKED UrbaN Styles, which adds several gritty street sets of textures. There is also a post-apocalyptic version, and even a character by famed character creator and texture artist, Morris

Too many sci-fis!

There is still so much really great daz sci-fi content that I still haven’t even covered. I was hoping to fit it all in here, but time is ticking away and 1000 words is more than enough for what is essentially a store feature. So, Content Feature Pt.3? Well if you’re game I’m game too. Hope I’ve pointed at least some of you in the direction of something useful that you don’t already have.

Happy renderings and see you next time.


Luxus and LuxRender Beginner’s Guide For DAZ Studio Pt.1 Lights and Materials


Join Now!


Cyborg rendered with Luxrender via Luxus for Daz Studio using SPPM method.

Beo Ripper from DAZ 3D store. Rendered to around 5000 passes with LuxRenders SPPM method

Tutorial: Getting started with Luxus and Luxrender

Hi there and welcome to my short Luxus/LuxRender for DAZ Studio beginners guide. This was originally intended as a very short article, but as with such undertakings the more one writes the more it becomes clear one needs to write more. So, in the interests of ease of reading and navigating I’ve decided to split the post in to two parts. One on materials and lighting and the other (much shorter) on rendering. As there is still much about LuxRender I don’t know, I consider both parts to be ongoing works in progress. I will add more information and any corrections as they arise.

I won’t be able to answer all your questions here, but I’ll do my best to get you started. I will say upfront that I am not a LuxRender guru, but I have been tinkering with it and poking around the Wiki and forums for some time now. Lux is undoubtedly a complex beast, and right now it might still have a good deal of development ahead before it is as fast, polished and feature complete as we would like, but it is a powerful engine that is unlike anything most DAZ Studio user’s will have experienced before.

…but I’m starting to get ahead here. Let me begin right at the start for those that have little or no idea of what Luxus and LuxRender are.

Luxus and LuxRender: unbiased rendering for all

What is Luxus? Luxus is a plugin for DAZ Studio (DS) that allows scenes arranged in in DS to easily be configured and exported to LuxRender.

So, what is LuxRender? The website’s overview describes it better than I can:

“LuxRender is a physically based and unbiased rendering engine. Based on state of the art algorithms, LuxRender simulates the flow of light according to physical equations, thus producing realistic images of photographic quality.”

What this means is that, unlike biased render engines like 3Delight and Firefly, light bounces around scenes in a physically accurate manner giving realistic results. Of course, this does not automatically guarantee good results. Positioning and configuring lights, materials and cameras is still just as important in an unbiased environment as they are with biased render engines. Materials are actually a central element of the Luxus/LuxRender experience. While many DAZ Studio ready products come with materials ready to render with 3Delight, very few come with materials that are Lux native. Luxus does its best convert default DS materials, and can give reasonable results, but to me using Lux to render converted DAZ mats is missing the point. To fully access the power of LuxRender one needs to delve deeper into material configuration, thankfully Luxus provides some very good materials from which we can begin our explorations.

…but achieving good renders, lighting, materials etc. is beyond the scope of this guide, and as some might say, beyond me in general (see what I did there?). The purpose of this guide is to help familiarise you with Luxus and to an extent, LuxRender. Luxus is a brilliant and relatively inexpensive plugin. I would argue that it is a lot more flexible in terms of interfacing with Lux and is better integrated with DS than its older cousin, Reality/2/3, which is undoubtedly still a very good plugin and has many great features that Luxus may never have. Reality is the premium product in terms of features, but for speed, flexibility, and price you can’t go past Luxus.

Where Luxus falls down, at least in the beginning, is that its key controls are hidden within DS’s interface, and the manual, as many have already discovered, is very light on details. The primary purpose of this guide is to illuminate the hidden workings of Luxus (did I just do a pun?).

Setting up LuxRender materials with Luxus

Quick note on the surface selection tool for new DS users. This tool is an invaluable time saver when creating scenes either for render with 3Delight or LuxRender. Browsing through the desired “surfaces” tab and drop down menus for just one of dozens or hundreds of surfaces can be a tedious job. The surface selector (press Alt, Shift, M) will let you quickly select the exact surface you want to edit and open it in the surfaces tab – quick and painless!

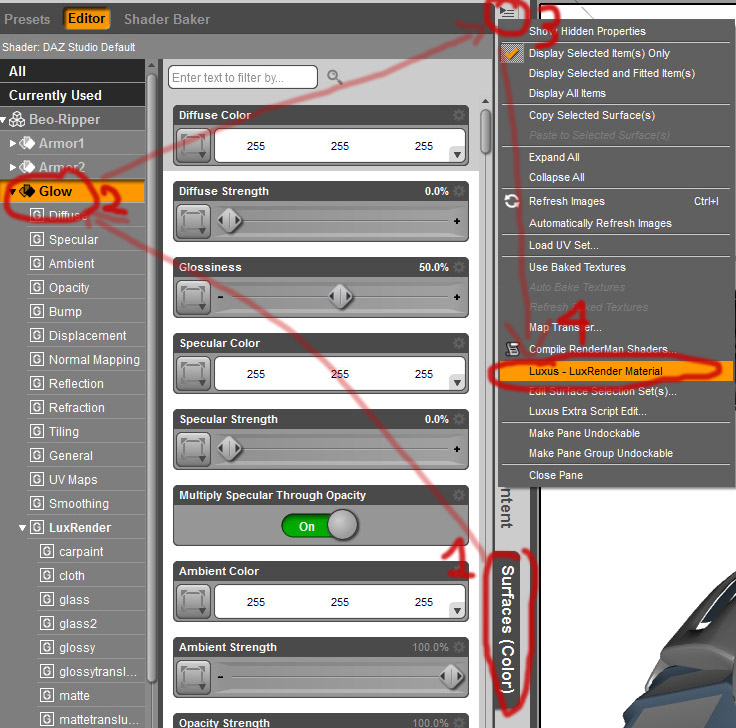
luxus material setup 1

Luxus’ material configuration tools are hidden within DS’s interface. (click for full image)

1. Select the surface the you want to edit first.
2. Click the “options” button (usually inside top of the taskbar you are working with – see above), and scroll down to and click “Luxus – LuxRender Materials”.
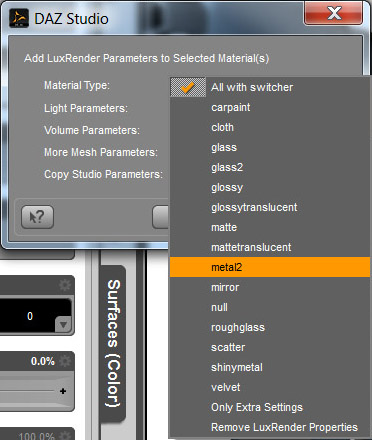
3. Select your material option of choice. I recommend you start with something easy like one of the metal or glass presets.

luxus material popup

The Luxus material popup contains a selection of LuxRender material bases.

4. You can access your new material and options from the “surfaces tab”, which should already be opened to the surface you are working with. Click the triangle expand menu icon and scroll down to “LuxRender” and expand again.
5. You can now tweak/outrageously experiment with your new materials.

Note that if you can convert multiple surfaces to the same type of Lux material at the same time if you have them selected when you apply the desired settings. To select multiple surfaces at a time, hold CTRL and click the desired surfaces either with the surface selection tool, or from the surfaces tab. This works very well for things like character skins where you will want to have uniform materials over several different surfaces.

More on materials

Many of these materials are quite specific in nature. This is great for getting good results fast. The metal and glass materials look fantastic and have some scope for tweaking to get the kind of metal or glass you want. Creating skin materials is much harder, but the matte translucent and glossy translucent materials are a great place to start. Selecting the “Volume Parameters” from the “Luxus – LuxRender materials” popup will open up more options for creating subsurface scattering effects. At this time the homogenous “LuxRender Volume Type” is the only real option for realistic skin. This can be selected from your surfaces menu under LuxRender > Volume.

Of course rendering this as is will likely produce results that are not at all to your needs. Creating good human skin is beyond the scope of this “basics” guide, and something I have only done a little experimentation with. Getting the best possible results requires a through reading and understanding of the materials section of the LuxRender Wiki. The Wiki is an invaluable source of information on how the rather complex render engine works, and really is a must for anyone that wants to go below the surface (yet more accidental puns. I’m on fia!).

UberSurface skin conversions and using DAZ surface settings to create and adjust LuxRender materials via “Copy Studio Parameters”

Luxus for daz studio ubersurface skin conversion

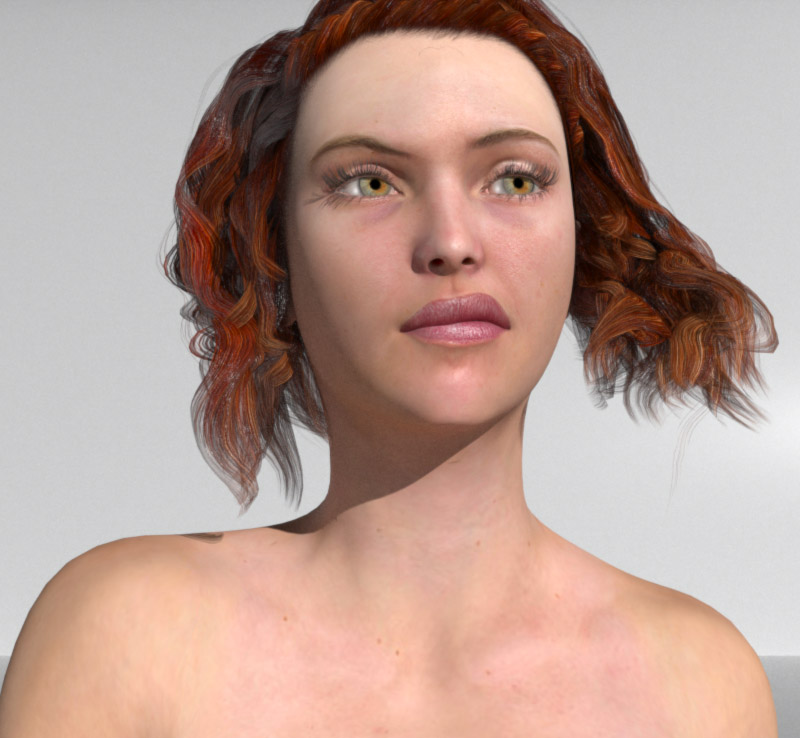
Raw Lux render of “Basic Genesis Female” with materials converted to LuxRender using Spheric Labs’ presets with minor tweaks.

In my naivety I didn’t even give Luxus’ conversion of UberSurface based character shader sets a chance, but Spheric Labs deserves a good deal of credit for setting up a very serviceable translation. The conversion will have varied results with different skin configurations as UberSurface rigs come in a huge variety. I found the current version of Genesis Basic Female/Male worked quite well but was a little on the matte side. In this case getting a more significant specular response involves adjusting the regular DAZ Studio materials for a combination of increased gloss, specular, reflection and perhaps tweaking their related colour values. I found this process confusing and found getting predictable results easier using and reconfiguring the provided LuxRender material presets.

luxus auto conversion sss

Here’s what the Luxus manual has to say on converting DAZ Studio materials, particularly UberSurface character presets to Lux materials:

“Luxus will automatically translate existing materials to LuxRender materials.The materials that exist in Studio are setup to look a certain way in 3Delight. Some of these materials are custom shaders whose implementation is know only to their respective authors. The names of the parameters are utilized by Luxus to do the translation. Depending on options, UberSurface and its derivatives are translated to a glossy translucent material with subsurface scattering and usually achieves excellent results.”

For Lux users deadset against learning about LuxRender materials the Luxus conversions and ability to tweak by using the regular DS surface editor controls, this method is a huge plus, and given practice and a good deal of trial and error could be used to produce some very good Lux materials.

Turning surfaces into lights

luxus surface lights

Setting surfaces as lights (click for full image)

1. With your material of choice selected navigate to the Luxus material selector popup (as described in steps 1&2 above).
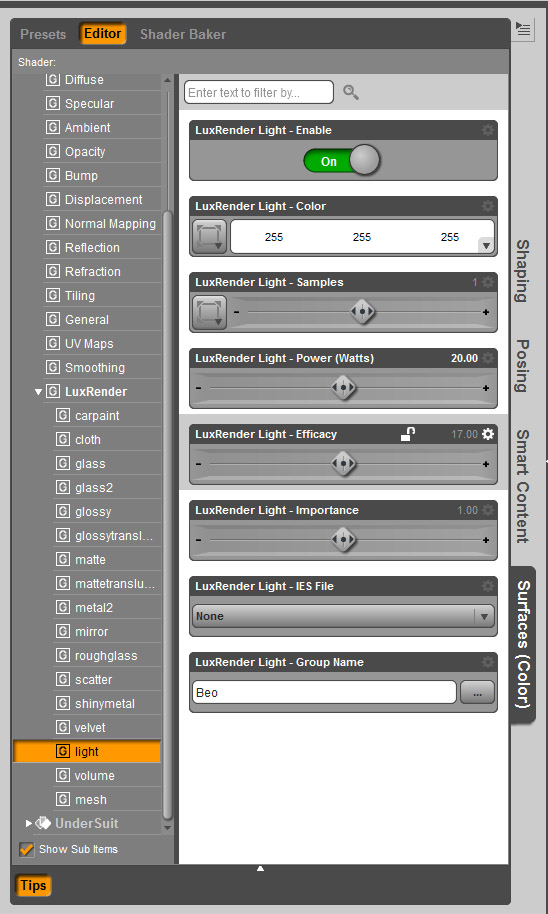
2. Check the Light Parameters box and “Accept”.
3. You will now need to open the surface materials in the “Surfaces” tab (also described above) and navigate to the lights section of the LuxRender submenu.
4. At the top of the window will be a box titled LuxRender Light- Enable. Toggle the option to on.

The above method can be used to turn planes into mesh (area) lights. For these you will need to create a plane primitive and place as desired. The “normal” must face the light’s target. The plane’s normal runs in the same direction the green translation indicator/handle, so point that green arrow at whatever you want to light. Follow steps as above (Turning surfaces into lights)

You will also notice that IES light profiles/maps can also be added to mesh lights. IES profiles, for those not in-the-know are files that contain light distribution data from real-world light sources such as globes, fluorescent tubes, flood lights etc. These, when applied to our lights in 3D spaces result in light sources that are much more realistic than the way the typical render engine defines these sorts of light sources. For more detail on IES files see this post/tube video. For a nice selection of IES files check out this little post by Derek Jenson, who offers us his handpicked favourites.

If you would like to see the lights before you import them into Lux you can use an IES viewer. This one is my favourite, and the favourite of many others – strangely enough it is called IESviewer.

Setting up LuxRender lights with Luxus

For this section of the tutorial I will demonstrate setting up an IBL source as it will give you a good rounded understanding of setting up other Lux lights in DS.

luxus light settings1

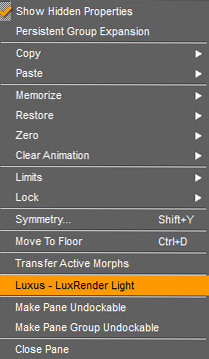
Select Luxus – LuxRender Light menu item to bring up the light selection popup.

1. Place a standard DAZ Studio distant light (any would do really), as you would normally
2. Select the “parameters” tab from your sidebar or wherever you typically select it from
3. Select the light you just created
4. Click the  “options” button (usually inside top of the taskbar you are working with) and scroll to and select “Luxus – LuxRender Light”

5. In your lights “Parameters” menu expand the “LuxRender Light” sub menu
6. Select “infinite”
7. Go to “LuxRender Infinite Light – Environment Map”
8. Locate the folder where you keep your HDR images and select your choice
9. Go to “LuxRender Infinite Light – Mapping” and make sure you have the correct map setting applied (Spherical appears to be the most common).If you’re not sure which is which see the Environment Map article on the Lux Wiki
10.Group/name your lights (done in parameters tab for all lights except mesh – done in surfaces). With the current version of Luxus I believe lights are automatically placed in separate groups, meaning they can be altered individually on the fly in Lux. Giving your lights a unique name as to their function or location can be very helpful to make tweaking them mid render quicker and easier.
11. You can also group any of your lights together by giving them the same name. Apparently this can speed up your renders, but you lose the ability to alter them individually during render. According to SphericLabs (developer) in a post in the Luxus thread on the DAZ 3D forums the performance boost by grouping lights is negligible. This could well be the case, but when CPU only render methods can take days for complex scenes the benefit might start to accumulate.

Other light types you may not be familiar with

Generally I would suggest using the standard DS distant or spot light bases to be your Lux light placeholders. Using these will give you an accurate indication of where your Lux lights will be pointing/placed.

Goniometric: another light that can use IES light profiles.

Sky/Sun: Will convert your Standard DS lights into light sources that mimic skies and suns (strangely enough).

Projection: Again, does as the name implies – will turn your lights into image projectors.

Luxus for Carrara

DAZ Studio 4 - Create 3D Art for Free

Eliane CK showing off the power of LuxRender and Luxus with one of her unmistakeable signature images

If you happen to be a Carrara user and haven’t yet discovered, for some strange reason, Luxus for Carrara was recently released. As the plugin is quite different from the DS counterpart, much of what is contained in part 1 of the guide will not be applicable. Part 2 is more general to LuxRender and therfore will contain a lot more information useful to Luxus for Carrara users, especially those new to LuxRender.

 Conclude Pt. 1

This concludes Pt. 1 of the guide. Most of the work for the second part has allready been completed and will be posted soon. It will cover Exporting your scene to LuxRender, render settings and methods, and the features and functions of Lux’s compact but powerful GUI. So, if you still haven’t picked up a copy of Luxus, grab it now. Like I said at the beginning of the article, I am treating this guide as a work in progress, so I intend to update and improve it in time. To that end, please feel free to leave any comments, questions, resource links, and possible corrections in the comments section below. You can also contact me directly via the contact form at the bottom of the About page.

Pt. 2 of guide